How to Install a Maxxair Maxxfan Deluxe
Upgrading your RV exhaust fan can make a world of difference in comfort and convenience! The exhaust fan that came stock in our RV bathroom had to be manually cranked opened which was such a hassle. We already had a Maxxair Maxxfan in our RV kitchen and thought it’d be a good idea to replace the one in the bathroom with the Maxxfan too.
We love tackling RV projects ourselves so if you’re up for the challenge, you’re in the right place! Today we’ll walk you through the process of how to install a Maxxair Maxxfan Deluxe.
*This post contains affiliate links. As an Amazon Associate, I earn from qualifying purchases and may receive a small commission when you make a purchase using my links at no extra cost to you. Thanks for your support!
Table of Contents
RV Exhaust Fan Replacement
When it comes to RV exhaust fan replacements, you have several great options to choose from. Maxxair and Fan-tastic are two of the most popular brands for this RV upgrade which I’ll be covering below.
Airxcel Maxxair Maxxfan
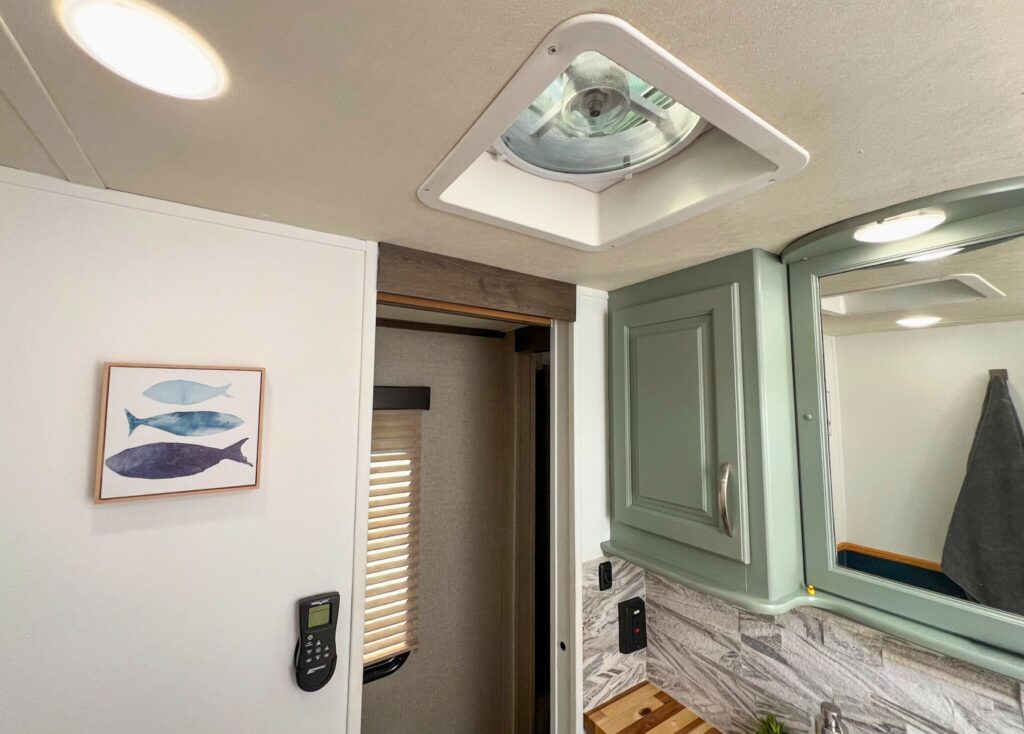
Airxcel Maxxair has a variety of Maxxair fans ranging from the Maxxfan mini and low profile models to the Maxxfan Plus and Deluxe models. We went with the Maxxfan Deluxe because of its advanced features like a built-in rain cover, 10-speed fan control for exhaust and intake, thermostat control, and remote operation. Its efficient design and quiet operation make it a standout option for those seeking convenience and comfort.

- ALL-IN-ONE VENTILATION SOLUTION: The Maxxair Maxxfan Deluxe combines a vent, fan, and vent cover into a single unit, providing a comprehensive solution for your RV’s ventilation needs.
- POWERFUL 10-SPEED FAN: Experience optimal temperature control with the powerful 10-speed reversible fan equipped with a thermostat. This advanced feature helps maintain a comfortable room temperature inside your RV at all times
- BUILT-IN RAIN PROTECTION: Enjoy peace of mind with the Maxxair Maxxfan Deluxe, which features a built-in rain cover that provides full-time protection, allowing you to use the fan while it’s raining or when driving, ensuring continuous ventilation in any weather.
- EASY MAINTENANCE: The Maxxair Maxxfan Deluxe is designed for user-friendly maintenance with an easy-to-remove interior insect screen that requires no tools. Keep your fan clean and functioning efficiently with minimal effort.
- DURABLE & RELIABLE: Built to last, this unit fits all standard 14″x14″ roof openings and is backed by a 2-year limited warranty and a lifetime limited warranty on the lid – a reliable choice for any RV.
One thing I love about our Maxxfan is how simple and easy it is to clean compared to other RV exhaust fans. You twist the tabs and the screen comes right off so you can rinse the dust off in the sink!
Dometic Fan-Tastic Vent Fan
Dometic’s Fan-Tastic Vent Fan is another well-known option in the industry. Similar to Airxcel, there are several fan options in the Fan-Tastic Vent Fan lineup. Their top of the line fan, model 7350, is most comparable to the Maxxfan Deluxe that we chose. It features 14 fan speeds, automatic lift dome, built-in thermostat, remote, and rain sensor. The biggest difference I see between this one and the Maxxfan is the fact that the Fan-tastic Vent Fan does not have an integrated rain cover.

- 14 fixed manual speeds or automatic variable speeds for customizable ventilation; Reversible airflow switch for efficient temperature control
- Built-in rain sensor with automatic open and close function for protection against the elements; manual knob closes the fan in case of emergency
- Thermostat controlled automatic lift dome for maintaining the desired temperature
- Convenient remote control with wall cradle for easy operation from anywhere within your RV
- Designed to fit most standard 14″ x 14″ roof vents; 2-wire 12 VDC hookup for easy installation
How to Install a Maxxair Maxxfan Deluxe
Even if you decided to go with a different RV exhaust fan, the steps to install your fan will likely be similar. Always consult the manufacturer’s instructions for installation and if you don’t feel comfortable doing this RV upgrade yourself, please hire a professional!
Supplies Needed
- Drill
- Wire cutters and wire stripper
- Putty knife
- Dicor butyl tape
- Dicor roof caulking
- Exhaust Fan
Installation Instructions
- Start by removing the inside trim of the old fan
- Turn off electricity that goes to the fan so that it is safe to work with
- Disconnect wires (you may have to snip them if they’re crimped at the top like ours were)
- Once you have the wires disconnected, there should be nothing on the inside holding the fan in place
- Take the roof receiving flange and apply your dicor butyl tape all the way around it
- Grab all needed supplies and head up to the roof
- Remove vent cover if you have one
- Pry up old dicor and remove the screws all the way around be careful not to damage the roof
- Once all the screws are removed and enough of the dicor is off, you should be able to lift the fan out of the opening in the roof
- You’ll want to make sure enough of the dicor is off to ensure you get a nice tight seal between the roof and the roof receiving flange
- When you have the receiving flange in you’ll then add in all the screws
- Now that the screws are all in place, cover each one with some dicor. This ensures that no water will get inside the screw holes
- Next, you’ll want to fill in the gaps between the old dicor and new dicor
- Place fan down into roof receiving flange
- Screw in the last 4 screws into the metal brackets
- Strip wires
- Twist the negative wires together and the positive wires together
- Twist the wire nut over the wires you just twisted together until it won’t twist anymore
- Screw in the new trim piece (you may need to cut it down if it’s too long)
That’s it! Easy, right? For a visual guide, check out our YouTube video below. Overall, we’ve been super happy with this RV upgrade and even ended up changing out the exhaust fan in the garage of our toy hauler to a Maxxfan too!
Have questions or tips to share? Drop them in the comments below!